Starting a website on WordPress is quite a task, you deal with domains and hosting, tweak your theme, and then realize that you also need to get people to see it, otherwise you put all that effort for nothing. Stats say that 17 posts are published every second on WordPress sites around the world. That creates a pressing question of how to get views on WordPress. There’s no one sure thing solution, as many factors will influence how much traffic you can get on WordPress: creating engaging content, working on SEO, and promoting your blog on social media. In this article, we’ll cover all the ways how to get more WordPress followers and go over getting started with your SEO for WordPress.
How to get noticed on Google and other search engines
Why do you need to get your website noticed in the first place? If you rank higher on search engines, you’ll get more organic traffic. According to the Backlinko blog, less than 1% of Google search users click links on the second result page, so it’s vital to get your SEO right. Getting indexed by search engines is the first step of SEO, so that’s where we get started.
To get your content indexed by the search engines, start with setting your privacy settings to public. Once your site is public, everyone will be able to see your site, including search engines.
To access your privacy options, go to My Site → Settings → Privacy.
You can also verify your website through a search engine. If you do that, you’ll access additional features like analytics and speed up the indexing process. To verify your website, you need to add a meta tag to your site’s header. You can add a meta tag and find all the verification services through My Site → Tools → Marketing → Traffic. WordPress supports verifying with Google Search Console, Pinterest, Bing, and Yandex.
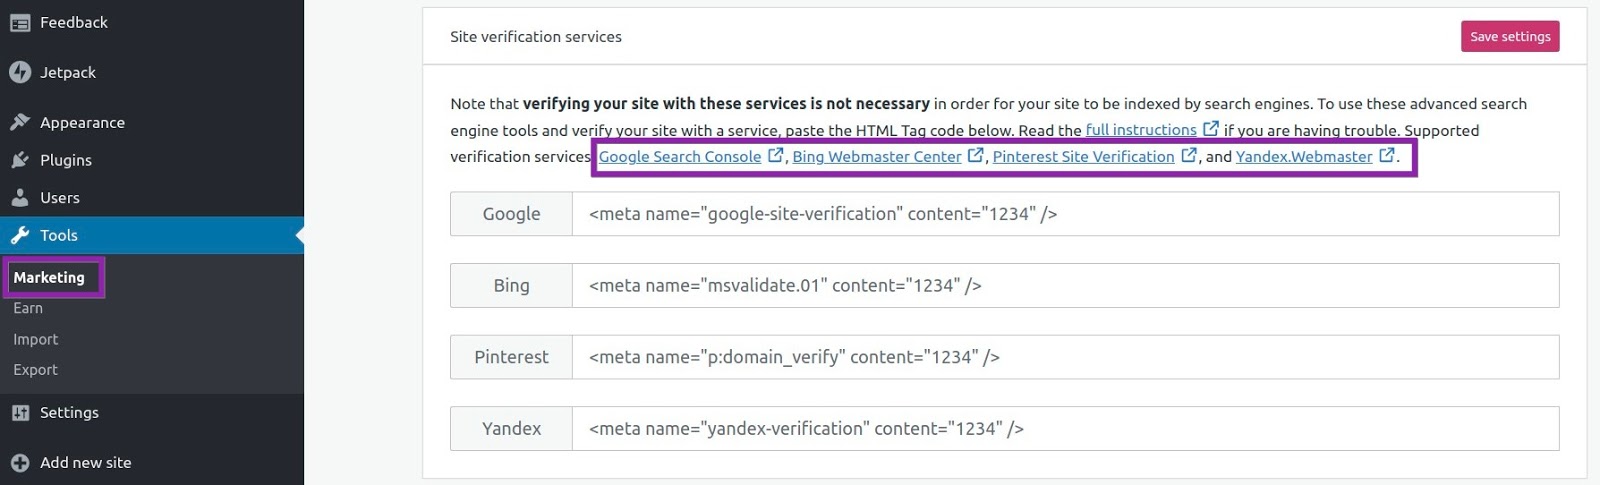
My Site → Tools → Marketing → Traffic.
We’ll walk you through verification with Google Search Console, which will work for you if you use the WordPress.com site address.
Here’s how to get your website verified:
- Log in to Search Console with your Google account, and click Add property.
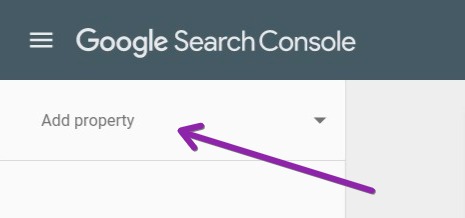
Add property to Google Search Console.
2. Select the URL prefix and enter your WordPress.com site’s address, including https://, and click Continue.
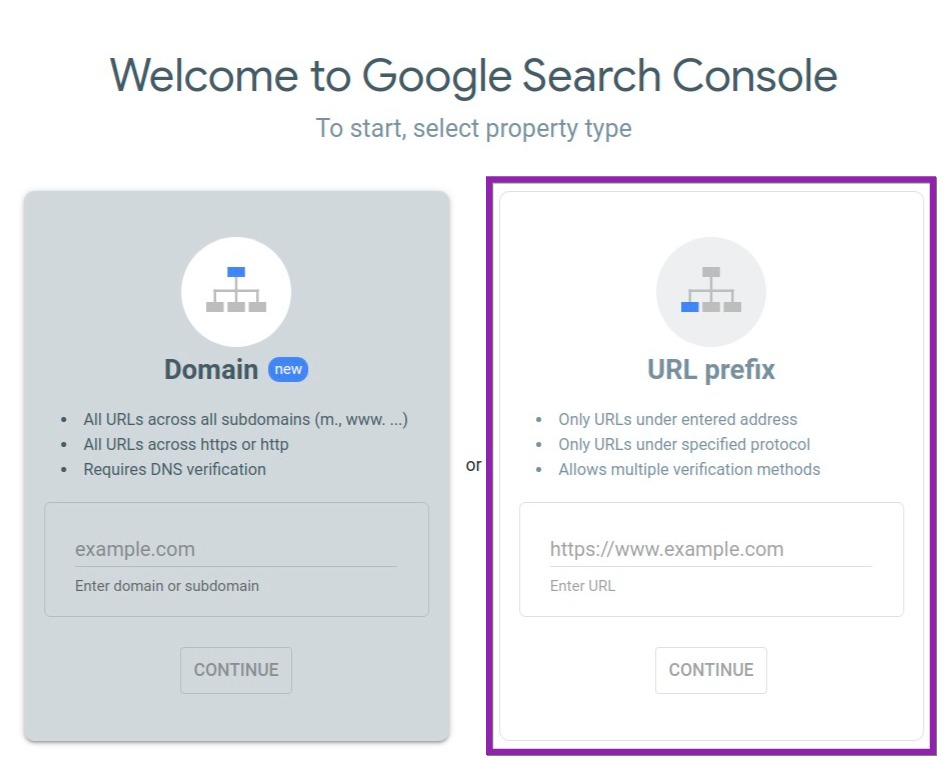
Choose URL prefix.
3. Scroll down to Other Verification Methods on the next screen, choose HTML tag. You’ll see a string of code, and the entire string should be copied.
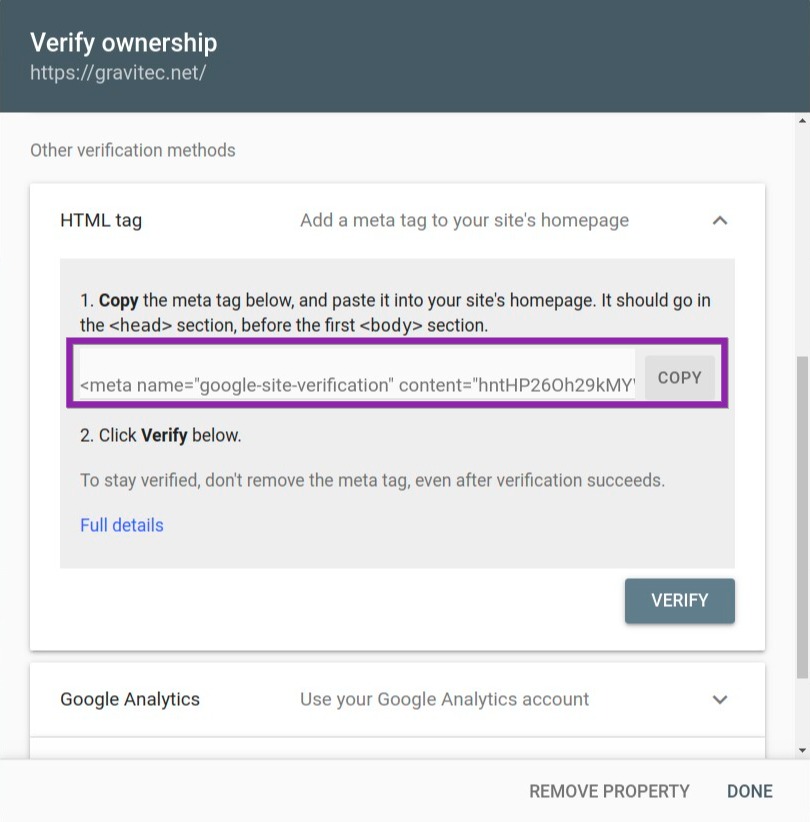
Copy the meta tag.
4. In a new tab, open your WordPress.com account and go to My Site(s) → Tools → Marketing → Traffic.
5. Paste the code you copied into the Google section.
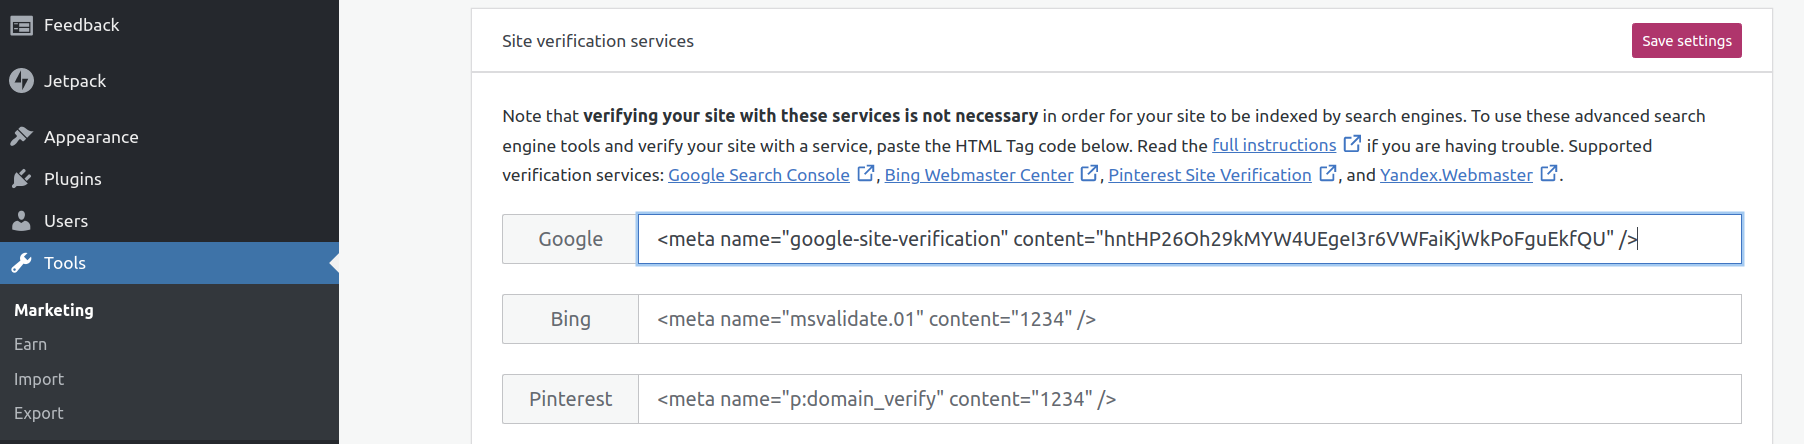
Paste the code.
6. Return to the Google Search Console verification page and click Verify.
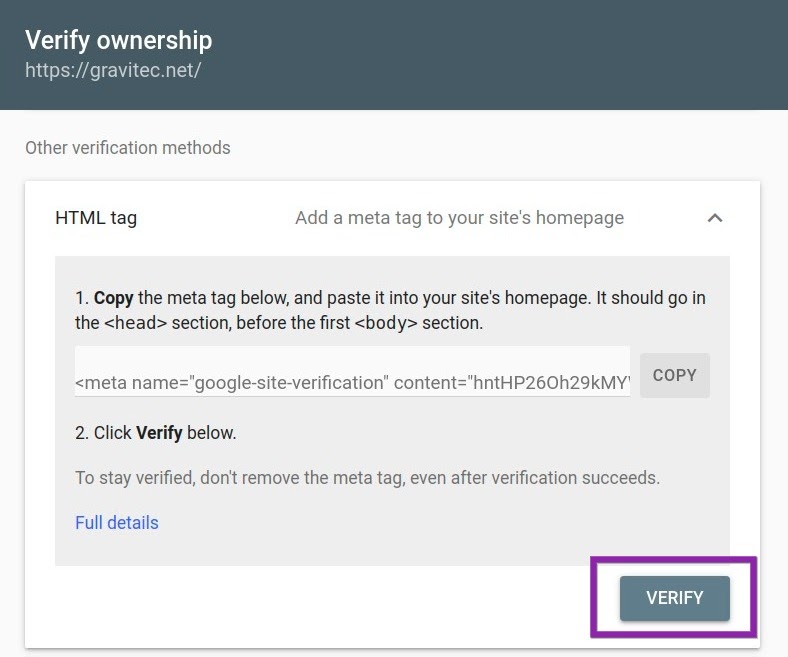
Verify ownership of the website.
If you have verified your WordPress website with Google console and consider doing the same for Bing, you can just import your settings from Google Search Console without going through the same steps twice.
Once you verify your WordPress website, you can plan your content, get readers to return to your website, optimize it for SEO and improve your site’s performance. It seems like a lot, but luckily, there are tools that can help you.
How to get more views on WordPress using tools and plugins
Plugins bring new features to your website. There are more than 58,000 plugins in the official directory. Which ones to choose? We recommend starting with multifunctional plugins that help you improve your content’s readability, help you connect with readers, make it more attractive both for search engines and your readers, and improve your website’s performance.
Yoast SEO
Yoast SEO is the one that knows how to increase blog traffic on WordPress.
The plugin helps you control what Google sees from your website and provides tips to make your posts SEO-friendly. It starts with avoiding easy mistakes like forgetting to use your keyword in your first chapter or failing to add alt text to your images. The rule of thumb is to write for your readers, but keep in mind SEO rules, as Google Search still runs on an algorithm. Yoast SEO highlights all the issues and gives tips on fixing them. You choose your keyword and optimize your page around it.
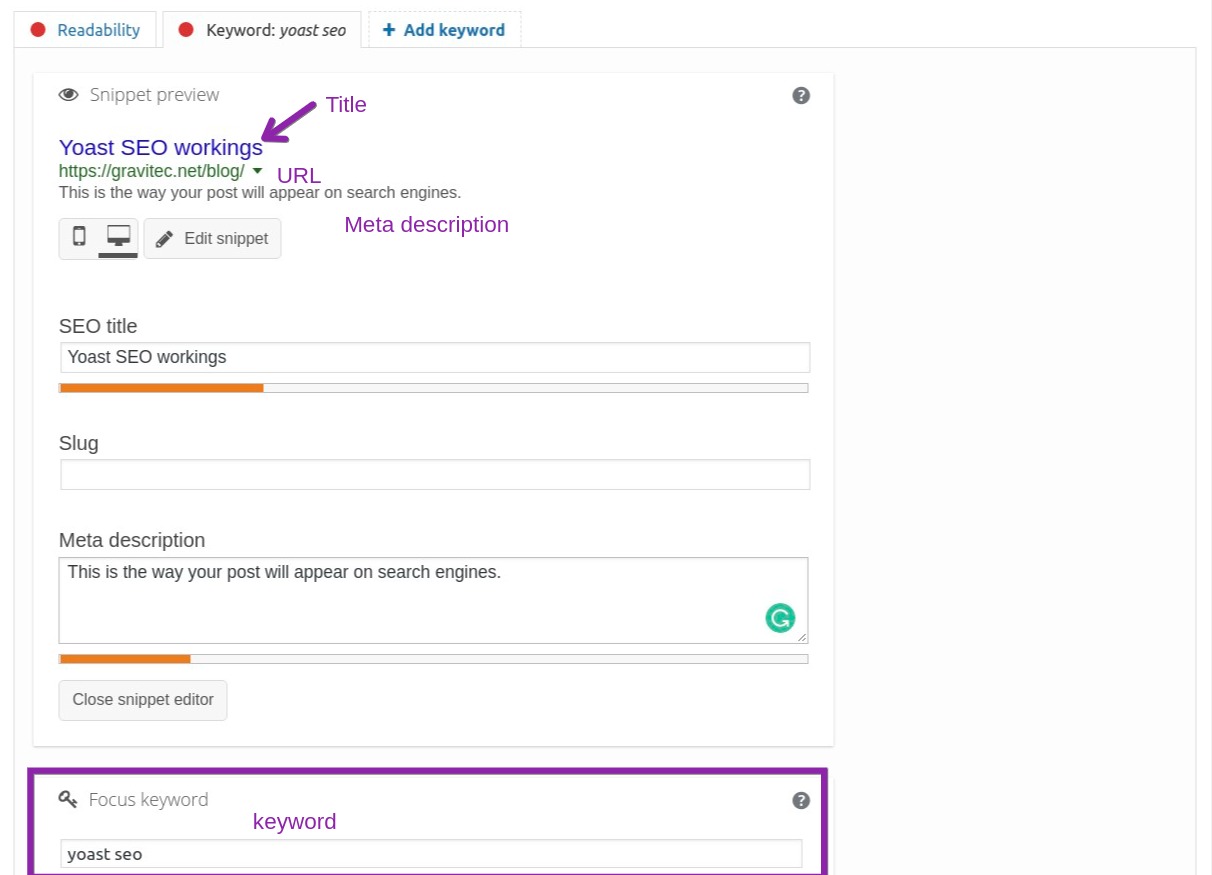
Yoast shows a snippet preview and lets you choose the focus keyword to optimize your article for.
It analyses your text and shows you how to improve it. For example, in the analysis below, you can see that the article needs a shorter title and some internal links so that the readers spend more time on their website, which is also important for SEO.
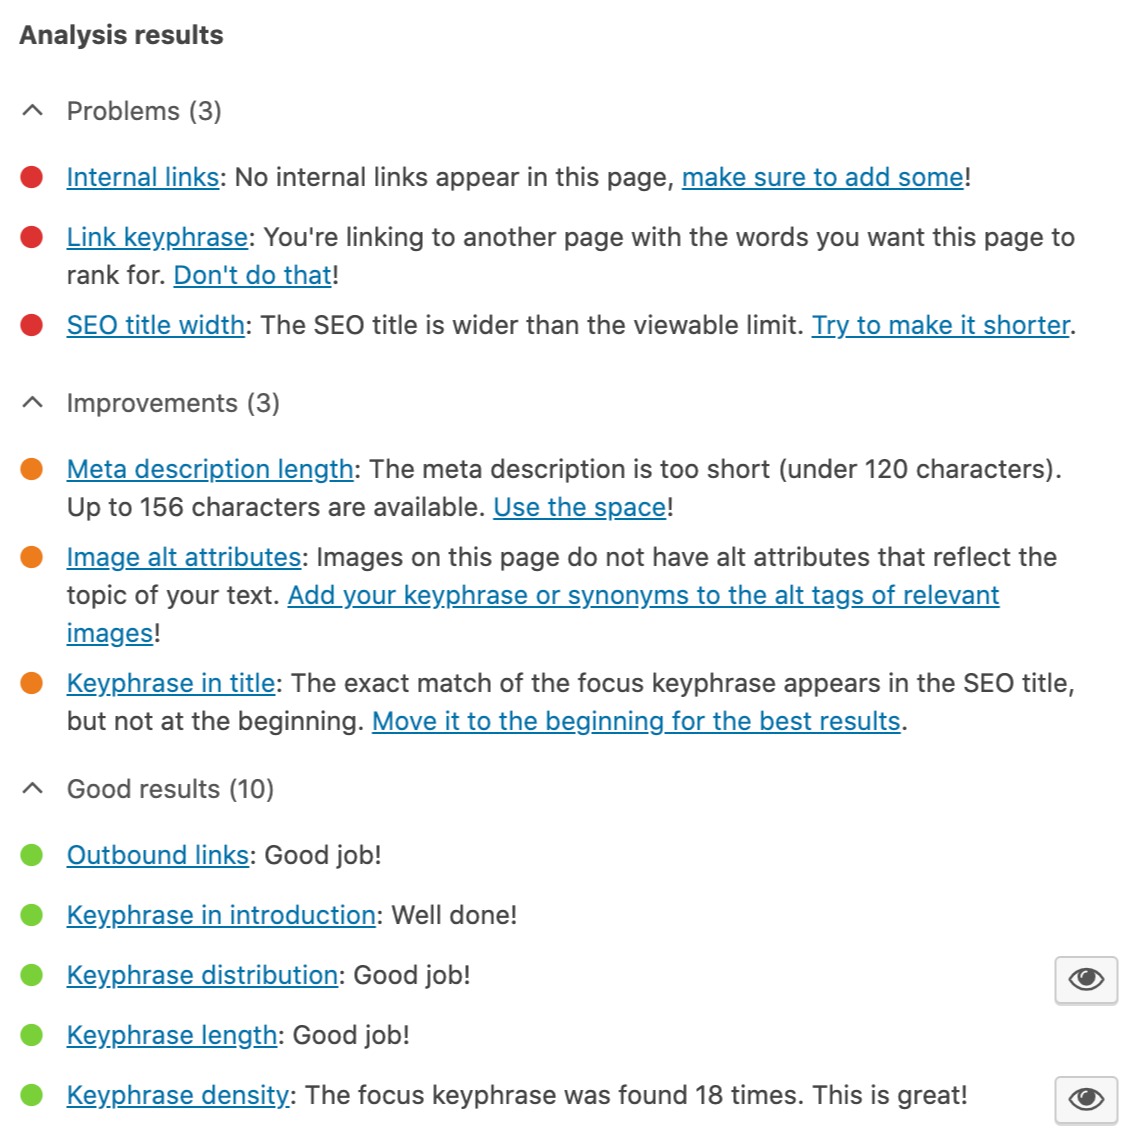
Text analysis and tips to improve. It also shows what you’ve done well.
You get to optimize your page for one keyword with a free version, the premium version gives you up to 5 keywords and related phrases.
Yoast SEO has other features. It can:
- generate XML sitemaps
- add social and schema markup
- enable breadcrumbs

Pricing: Yoast provides a free version of the plugin; premium plans start from €89/year.
Gravitec
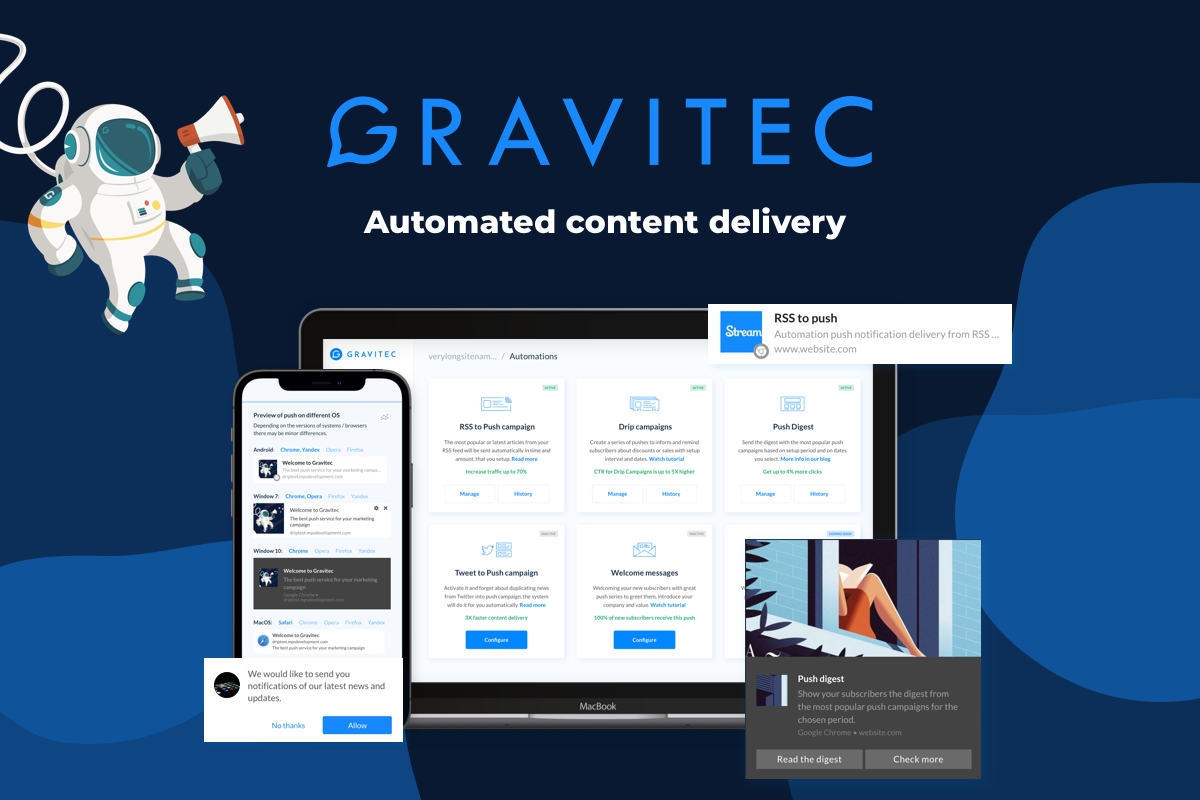
The average bounce rate of the WordPress website, or the number of people who come to your website and leave immediately, is 40.5%, so it’s not just about getting blog followers. It’s about getting them to stay or return. That’s something push notifications can help you with. Gravitec WordPress plugin lets you send notifications to your visitors on mobile and desktop devices to increase engagement. The users will see a notification about a new post even when they’re not on your site.
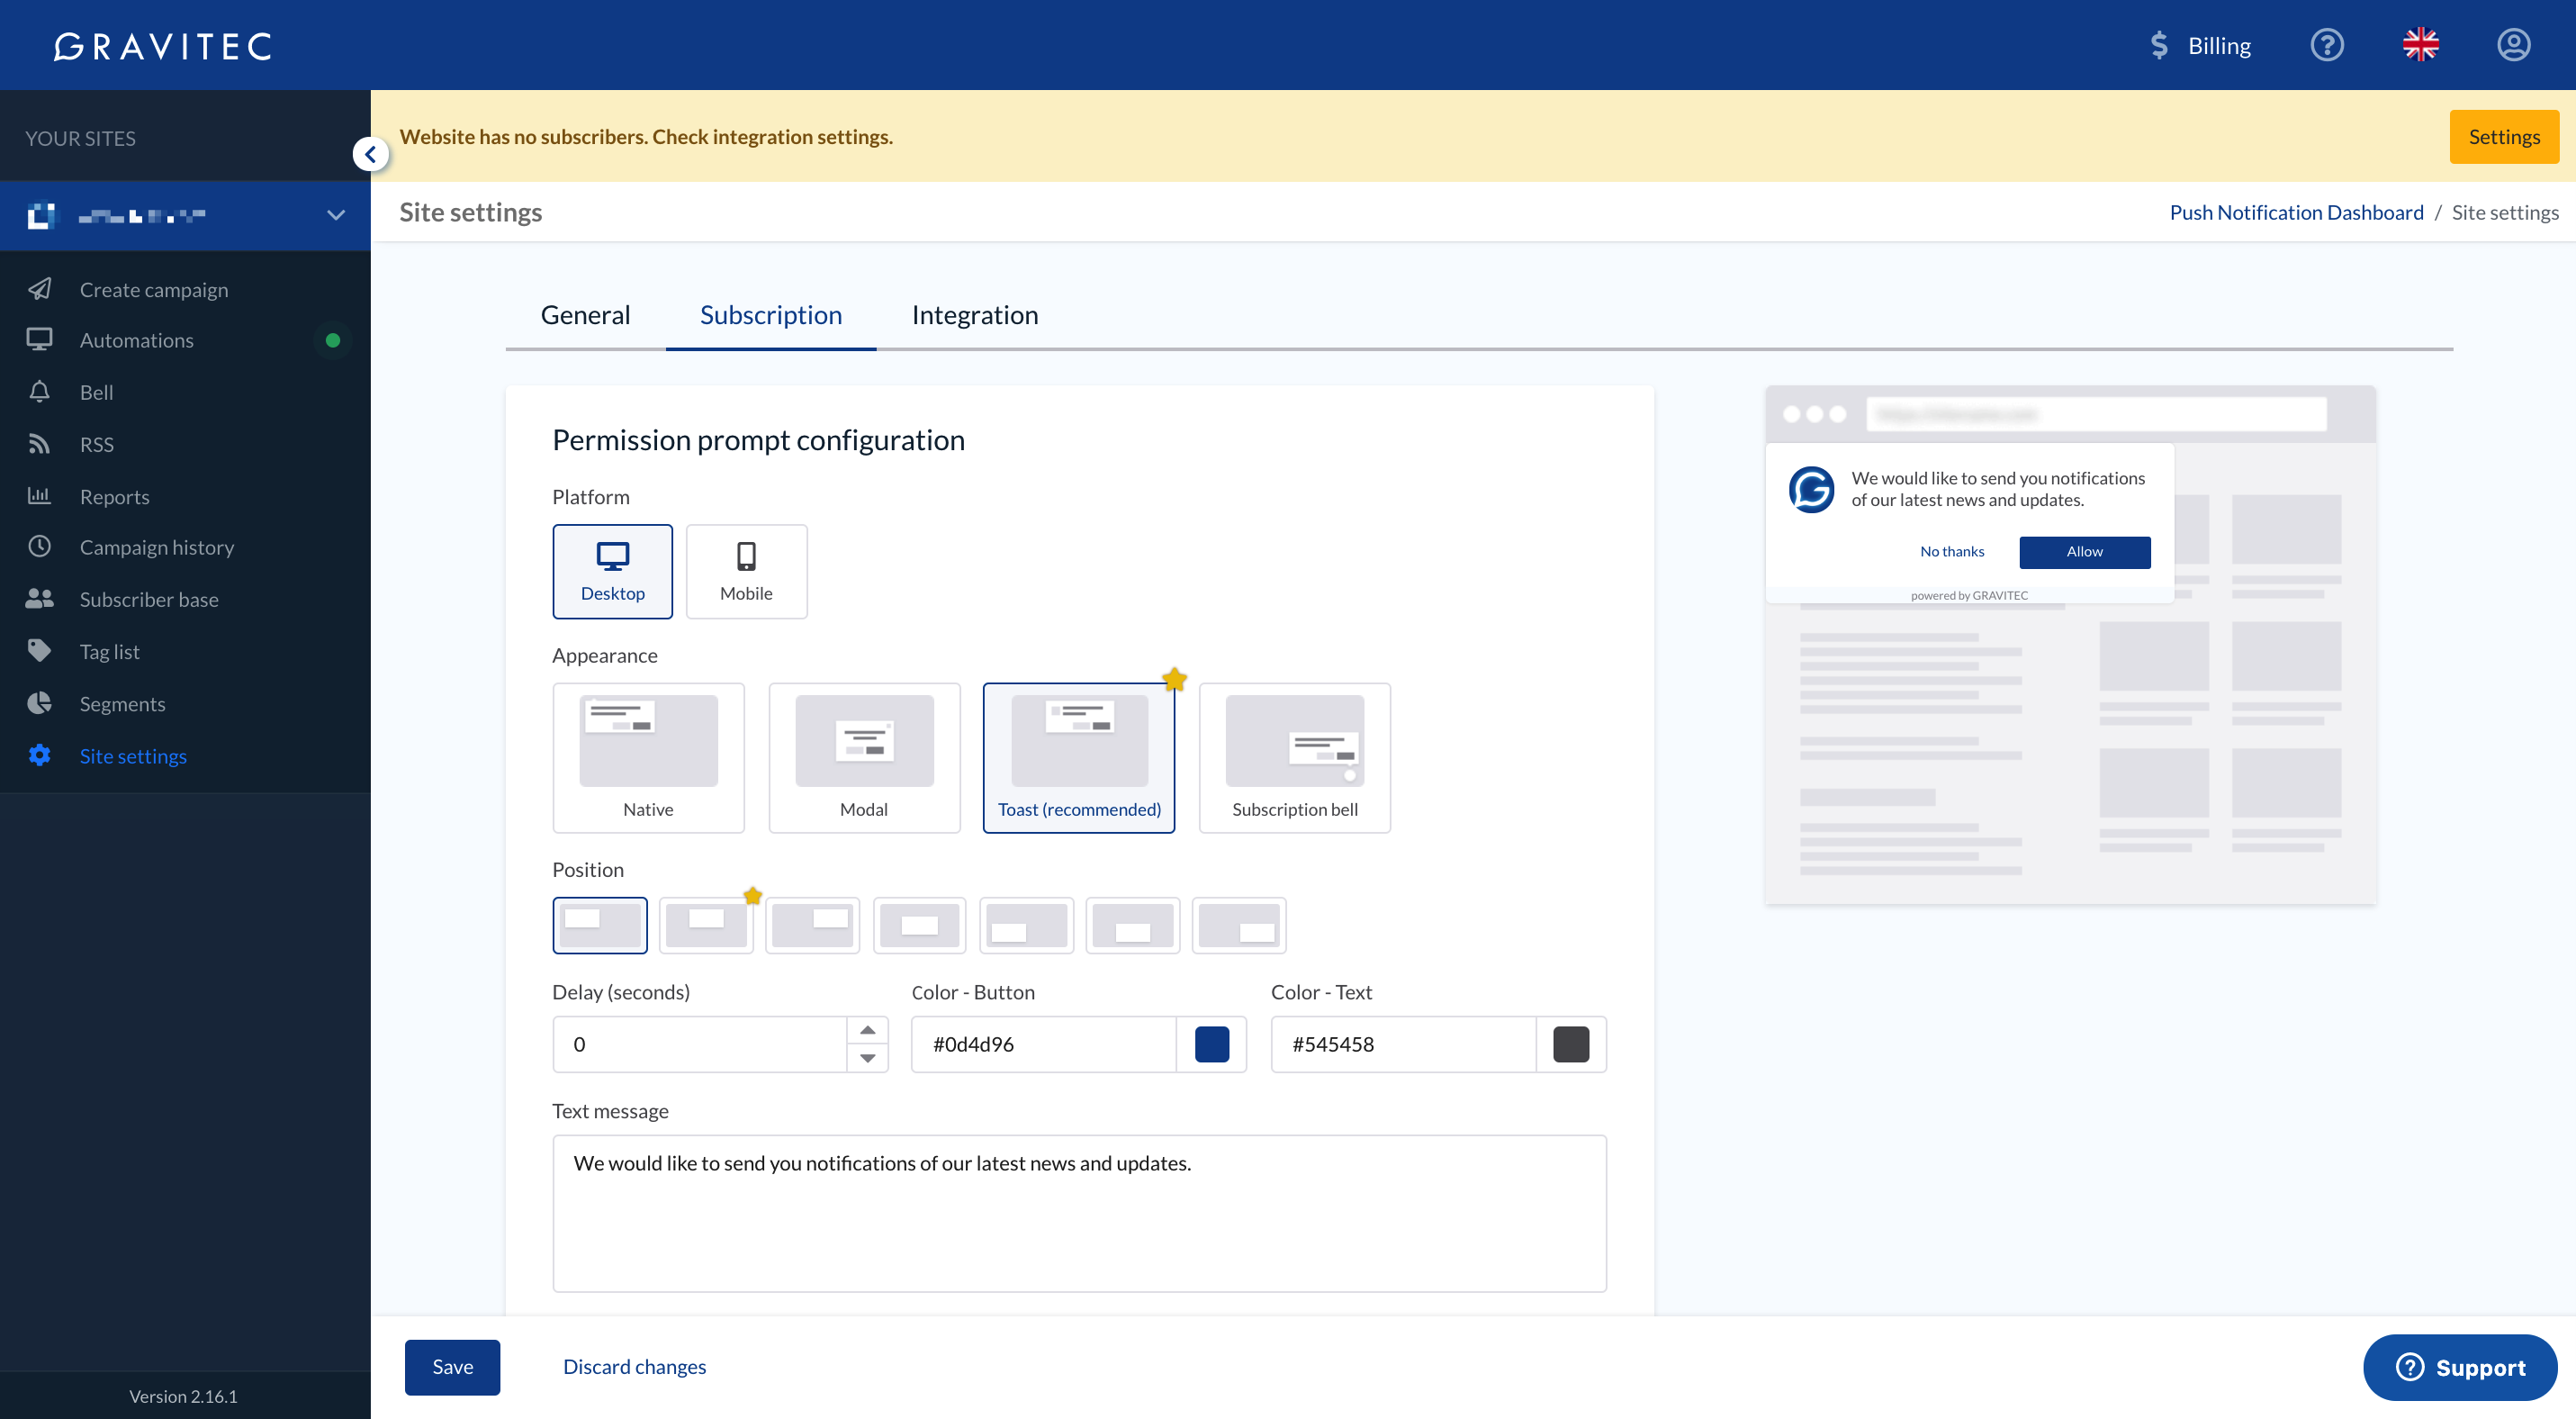
Gravitec lets you customize the subscription prompt for your audience.
To start getting your notifications, your website’s visitors will need to confirm that they’re ok with receiving notifications by clicking on the subscription prompt. With Gravitec, you can make it more attractive for your visitors and customize it. You can automate your notifications and choose from Drip campaigns, RSS to Push, Push Digest, Welcome Message, Tweet to Push, and API automations. Automated campaigns will save your time and prevent mistakes like forgetting to send a digest.
Other features include:
- Bell widget
- Unlimited websites
- Unlimited tags and segments
- Tweet to Push

Pricing: free up to 10k subscribers. Paid plans start from $8.7 a month for 30,000 subscribers per website. Lifetime Deal comes for $149.
All in One SEO
All-In-One-SEO is another plugin to help you get more organic traffic. 2 million websites use it, so it definitely can offer help on how to get your blog noticed on WordPress. It can add meta tags, notify search engines about changes on your website and submit XML maps. It’s very beginner-friendly, just install and activate the plugin using the setup wizard, and it’ll automatically make your content more indexable. You can also configure the plugin for your needs. It shows an SEO score for your posts and pages with tips on improving your content and optimizing their performance. Plus, you can do a complete SEO audit in the dashboard.
Other features:
- local SEO
- schema markup
- integration with webmaster tools
Pricing: it comes as a free plugin with four paid plans available: Basic ($99 per year), Plus ($199 per year), Pro ($399 per year), and Elite ($599 per year).
You can optimize your SEO all you want, but if your site takes ages to load all the pictures, you’ll lose readers. Also, Google indexes faster websites higher than slow-loading websites.
WP Rocket
According to Kissmetrics research, 40% of people will leave if your website takes longer than 3 seconds to load. With WordPress, it’s especially important because WordPress creates pages on the go, which requires finding information, putting it together, and showing it to the user. It makes everything a bit slower if many people are visiting your website at once. But since every second counts, you can use caching plugins like WP Rocket to make your website load faster. With WP Rocket, instead of going through the whole process, the plugin makes a copy of the page after the first load and shows it to the website visitors.
WP Rocket is beginner-friendly. You can instantly cache your website with one click. It will automatically turn on recommended cache settings.
Other features include:
- E-commerce optimization
- Gzip compression
- Lazy load images

Pricing: from $49 a year for one website. There’s no trial period, but they offer 14 days money-back guarantee.
Once you’ve installed the plugins and worked out the kinks, you can also use WordPress internal tools that improve your indexing.
Categories and tags
WordPress lets you sort your posts into categories and tags, making it easier for readers to find what they’re looking for and help search engines understand your site’s structure. Categories are meant for grouping your posts within broader themes. They are hierarchical, so you can add child categories to them. For example, you can see all the posts in this category if you go to Blog > Guides in your navigation menu. Tags work like specific keywords that identify content within individual posts and pages. You won’t see them in the article, but they will help users find what they’re looking for. For example, posts filed under the category of SEO can have tags like plugins or internal links. Use the categories and tags properly, and it’ll help readers and search engines browse your website.
Start with connecting your WordPress.com website to social media services. Once you do that, you’ll be able to share all your posts automatically. You can connect the services in your dashboard. Go to My Site → Tools → Marketing → Connections. Click the Connect button, and follow the appearing instructions.
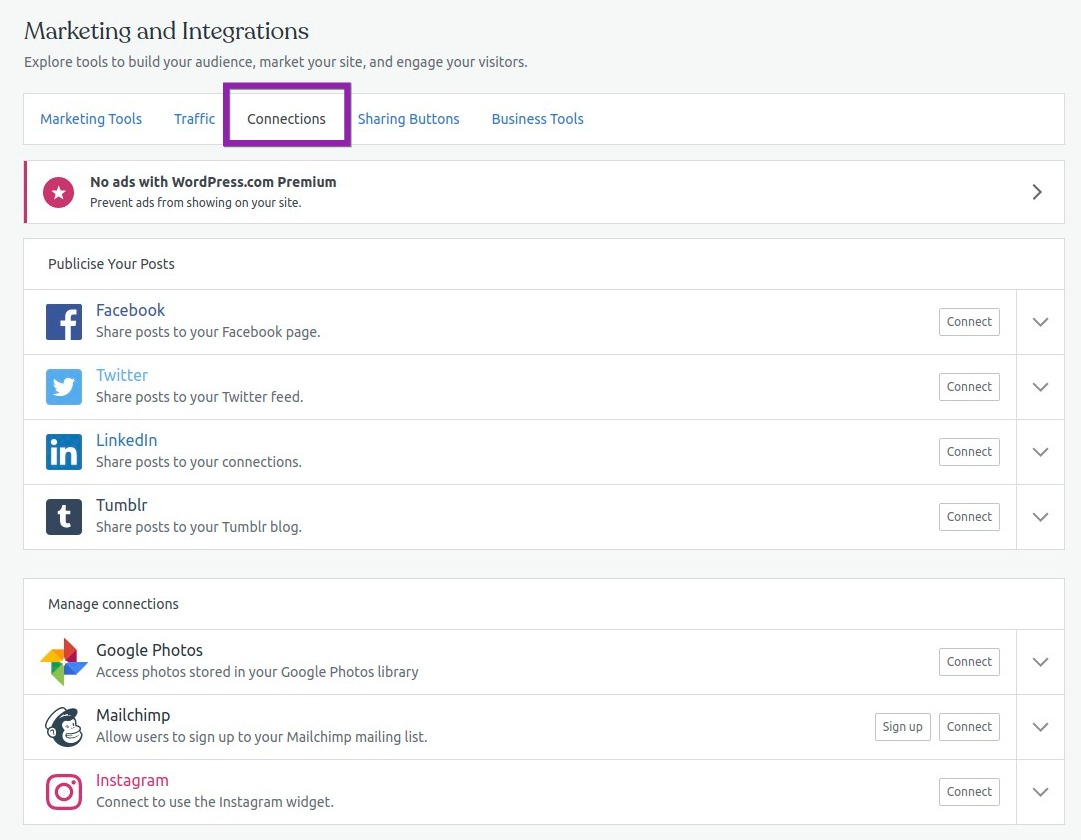
My Site → Tools → Marketing → Connections.
No matter the service you choose, you’ll need to authorize WordPress.com to post your updates. Let’s see how it functions with Twitter.
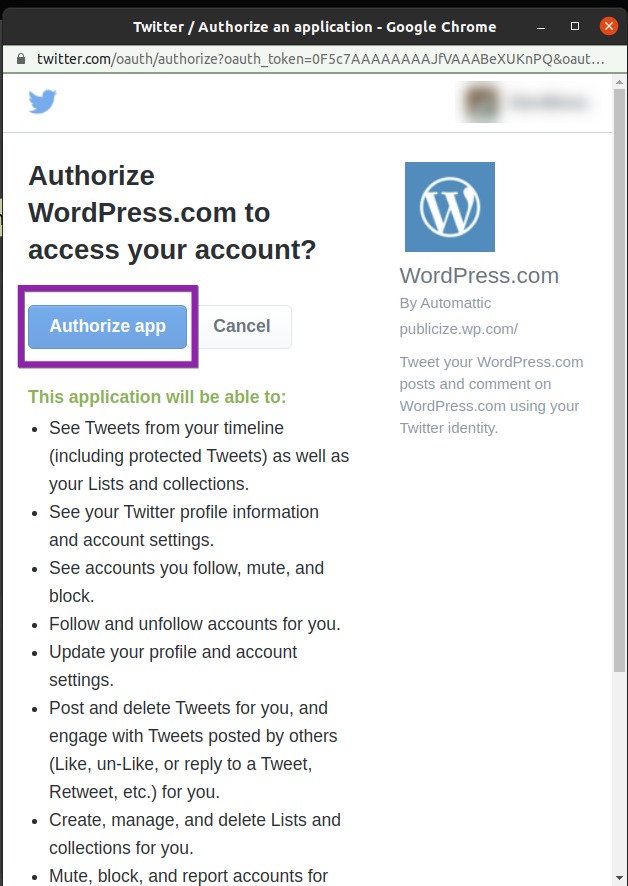
Authorize the connection with Twitter.
Choose the Twitter account you want to connect to. Return to WordPress.com and confirm the connection. Select Connect. That’s it. Now, once you post something, it’ll be automatically broadcast to your social media feed.
Once you authorize the connection, you’ll see a confirmation screen with connected social media every time you create a new post. If you don’t want to share the post with all the followers, you can turn off the toggle for a specific social media resource, for example, share it on Twitter only, but not on Facebook Page. (Facebook doesn’t let any third-party services post on your profile. However, you can use this tool to share posts to your Facebook Page.)
There are also many plugins that can help share your content, so we’ve narrowed down the options for you. Choose the right marketing plugin.
You can also reshare already published posts if you have a Premium or Business plan. Go to My site → Posts, and find the post you’d like to reshare. Click on three dots to the right of the post and select the Share option.

Click Share to repost old content on social media.
You’ll then see a new window where you can add a custom message and choose which social media platform you want to share to. Select Share Post to re-share the post. Create different messages for different social media accounts to target specific audiences. The resharing features can be helpful because the posts on social media disappear very quickly, so you can reshare one post a couple of times with different text. This way, you’ll increase your visibility and keep your profile more active, which will appeal to social media algorithms.
You can also add sharing buttons using WordPress plugins to make it easier for your readers to share your posts with their network. It could become an easy way to expand your reach.
Facebook Groups
If you just learned how to promote your WordPress blog, your pages are being built up, so you can start with sharing your content on your personal profiles or Facebook groups. There are all kinds of groups to cover the topics you write about. However, there’s more to it than joining the group and spamming with the links to your blog. In some groups, you might be banned for that. That’s rather a good thing, which means admins are concentrated on relevant content, and the group is full of real people who interact with each other. Start by listening in, interact with people, comment posts, answer questions if you can, or ask questions relevant to your niche.
Quora
You can also answer questions on websites like Quora or search for questions on topics you already write about on your blog, write answers, and include links to your original blog post with a more detailed answer when relevant. Answering questions on Quora will contribute to your networking, but it’ll also provide some backlinks for your website and increase blog traffic.

Choose from thousands of topics.
There are all kinds of topics on Quora, so you can demonstrate your expertise, make new connections and find new readers for your blog. Just create useful answers and avoid looking spammy.
The main thing about promoting content on social media is to remember that ‘social’ is the key component. You can’t use your posts like an RSS feed. That’ll most likely result in zero likes and won’t get you WordPress followers. Whether you share your articles in your Feed or a Facebook group or a Reddit thread, talk to people, listen to what they’re interested in and build your network of connections. This way, they’ll be way more interested in what you have to say.
How to promote your WordPress blog with paid solutions
With so many posts being created every second, consider paid options to amplify your content. Trying Facebook or Instagram ads can help you reach audiences outside your organic reach and get more views on WordPress. You don’t have to be selling anything to make the most of Facebook ads, but they’ll get you some exposure to the target audience.
Research your ideal audience and show them your content. Also, pay attention to the results you’re getting to find the version that works to increase page views. You can cut costs by driving your readers to content with relevant affiliate links. It can help justify the cost of advertising. To get the best results, test different kinds of copy, heading, or image to see what works best. All the ad campaigns run through Facebook Ads Manager. You can find it under Platforms and Products on Facebook for Business.

Once you’re in the manager, click a green button in the top left corner to create your first ad.
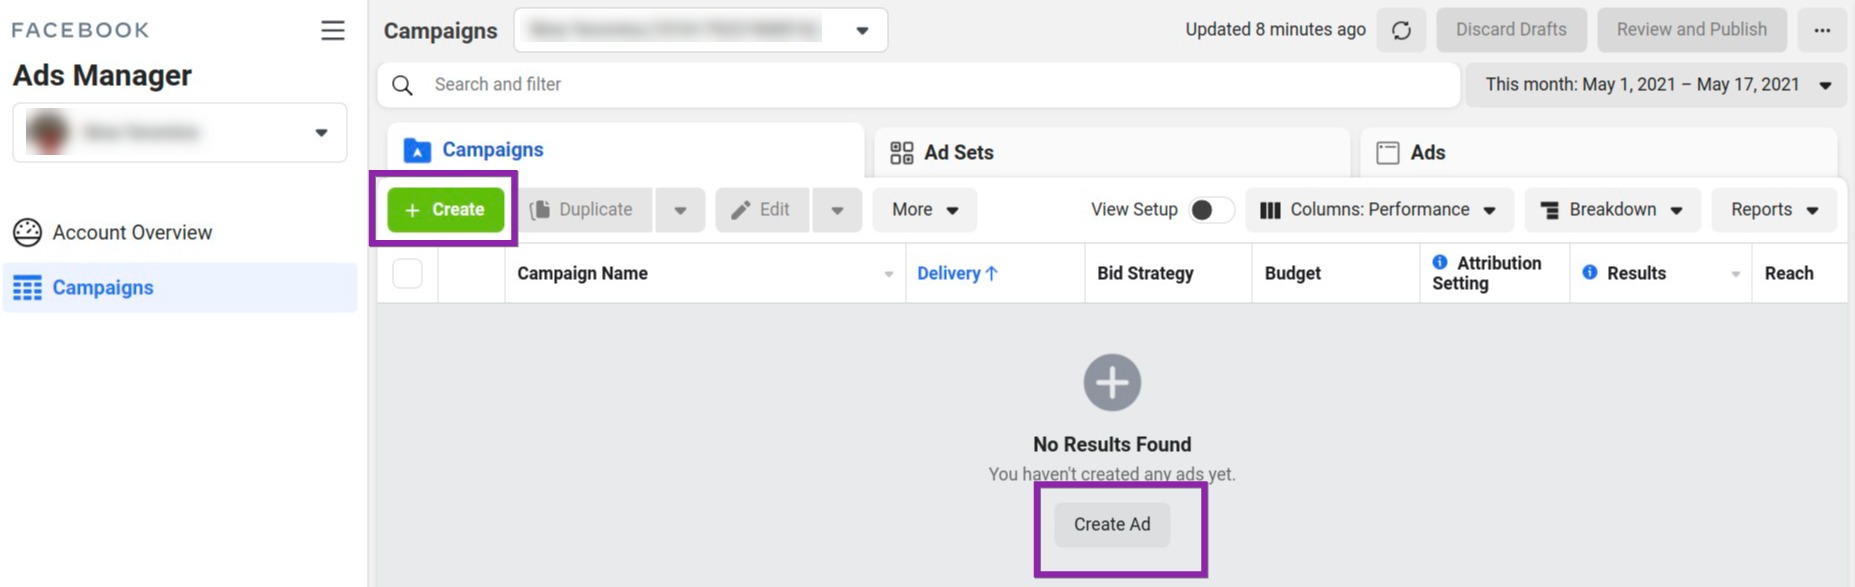
Create a new ad.
Once you get started, you’ll see objectives for what you might want to achieve. They fall under three categories that work around different sets of goals. You can generate interest in your blog, get people to look for more information about your blog, and encourage people to buy your product or service.

There are three categories of objectives.
According to Moz’s case study, you’re most likely to get some traction on a small budget with an awareness-type ad. They found that $1 per day can grow your audience by 4,000 people.
Once you’ve chosen your objective, customize your audience. You can choose the following demographics:
- Location
- Age
- Gender
- Interests — Facebook looks at a person’s interests, activity, closely related topics, and Pages they like
- Behavior — Facebook looks at purchase behavior and intent, device usage
- Connections — Facebook can show your ad to all people, people connected to your page or not connected to your page
You can also choose to include or exclude people who interacted with certain pages or apps and create customized audiences to target people who have already interacted with your blog.
-


- Estimated reach of the ad.
-
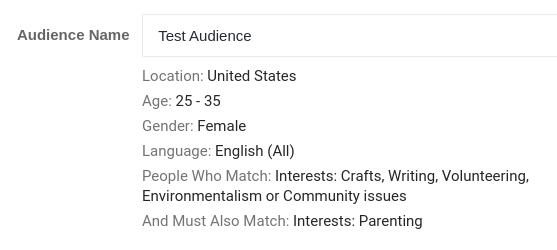

- Demographic settings for the test audience.
For example, for the test audience demographic we’ve chosen younger women who live in the USA and are interested in crafts, writing, and social issues. This gave us an estimated reach of 4,300 people out of 11 million. That’s how many people we can expect to potentially see our ad on any given day.
When you’ve chosen the audience, set up your budget, the maximum amount you want to spend. You can choose between a daily and lifetime budget. A daily budget is an average of what you’ll spend in a day. A lifetime budget is the maximum amount of what you’ll spend during the lifetime of your ad.

Daily budget.
Once you’re all set up, unleash your creativity and create your ad. Choose the image or video, copy, and headline. For the text, Facebook recommends up to 125 characters. You can either create your ad from scratch or use an existing post.
Summary
If you just start to learn the ropes of how to get views on WordPress, it can seem overwhelming. Start with the steps that have the maximum effect:
- Verify your website with search engines.
2. Make your website and content SEO-friendly with plugins.
3. Speed up your WordPress site’s performance.
4. Connect push notifications.
5. Share your posts on social media.
. 6. Run Facebook ads.